Getting Started with Melia
Everything you need for your first hour, in the order you'll need it.
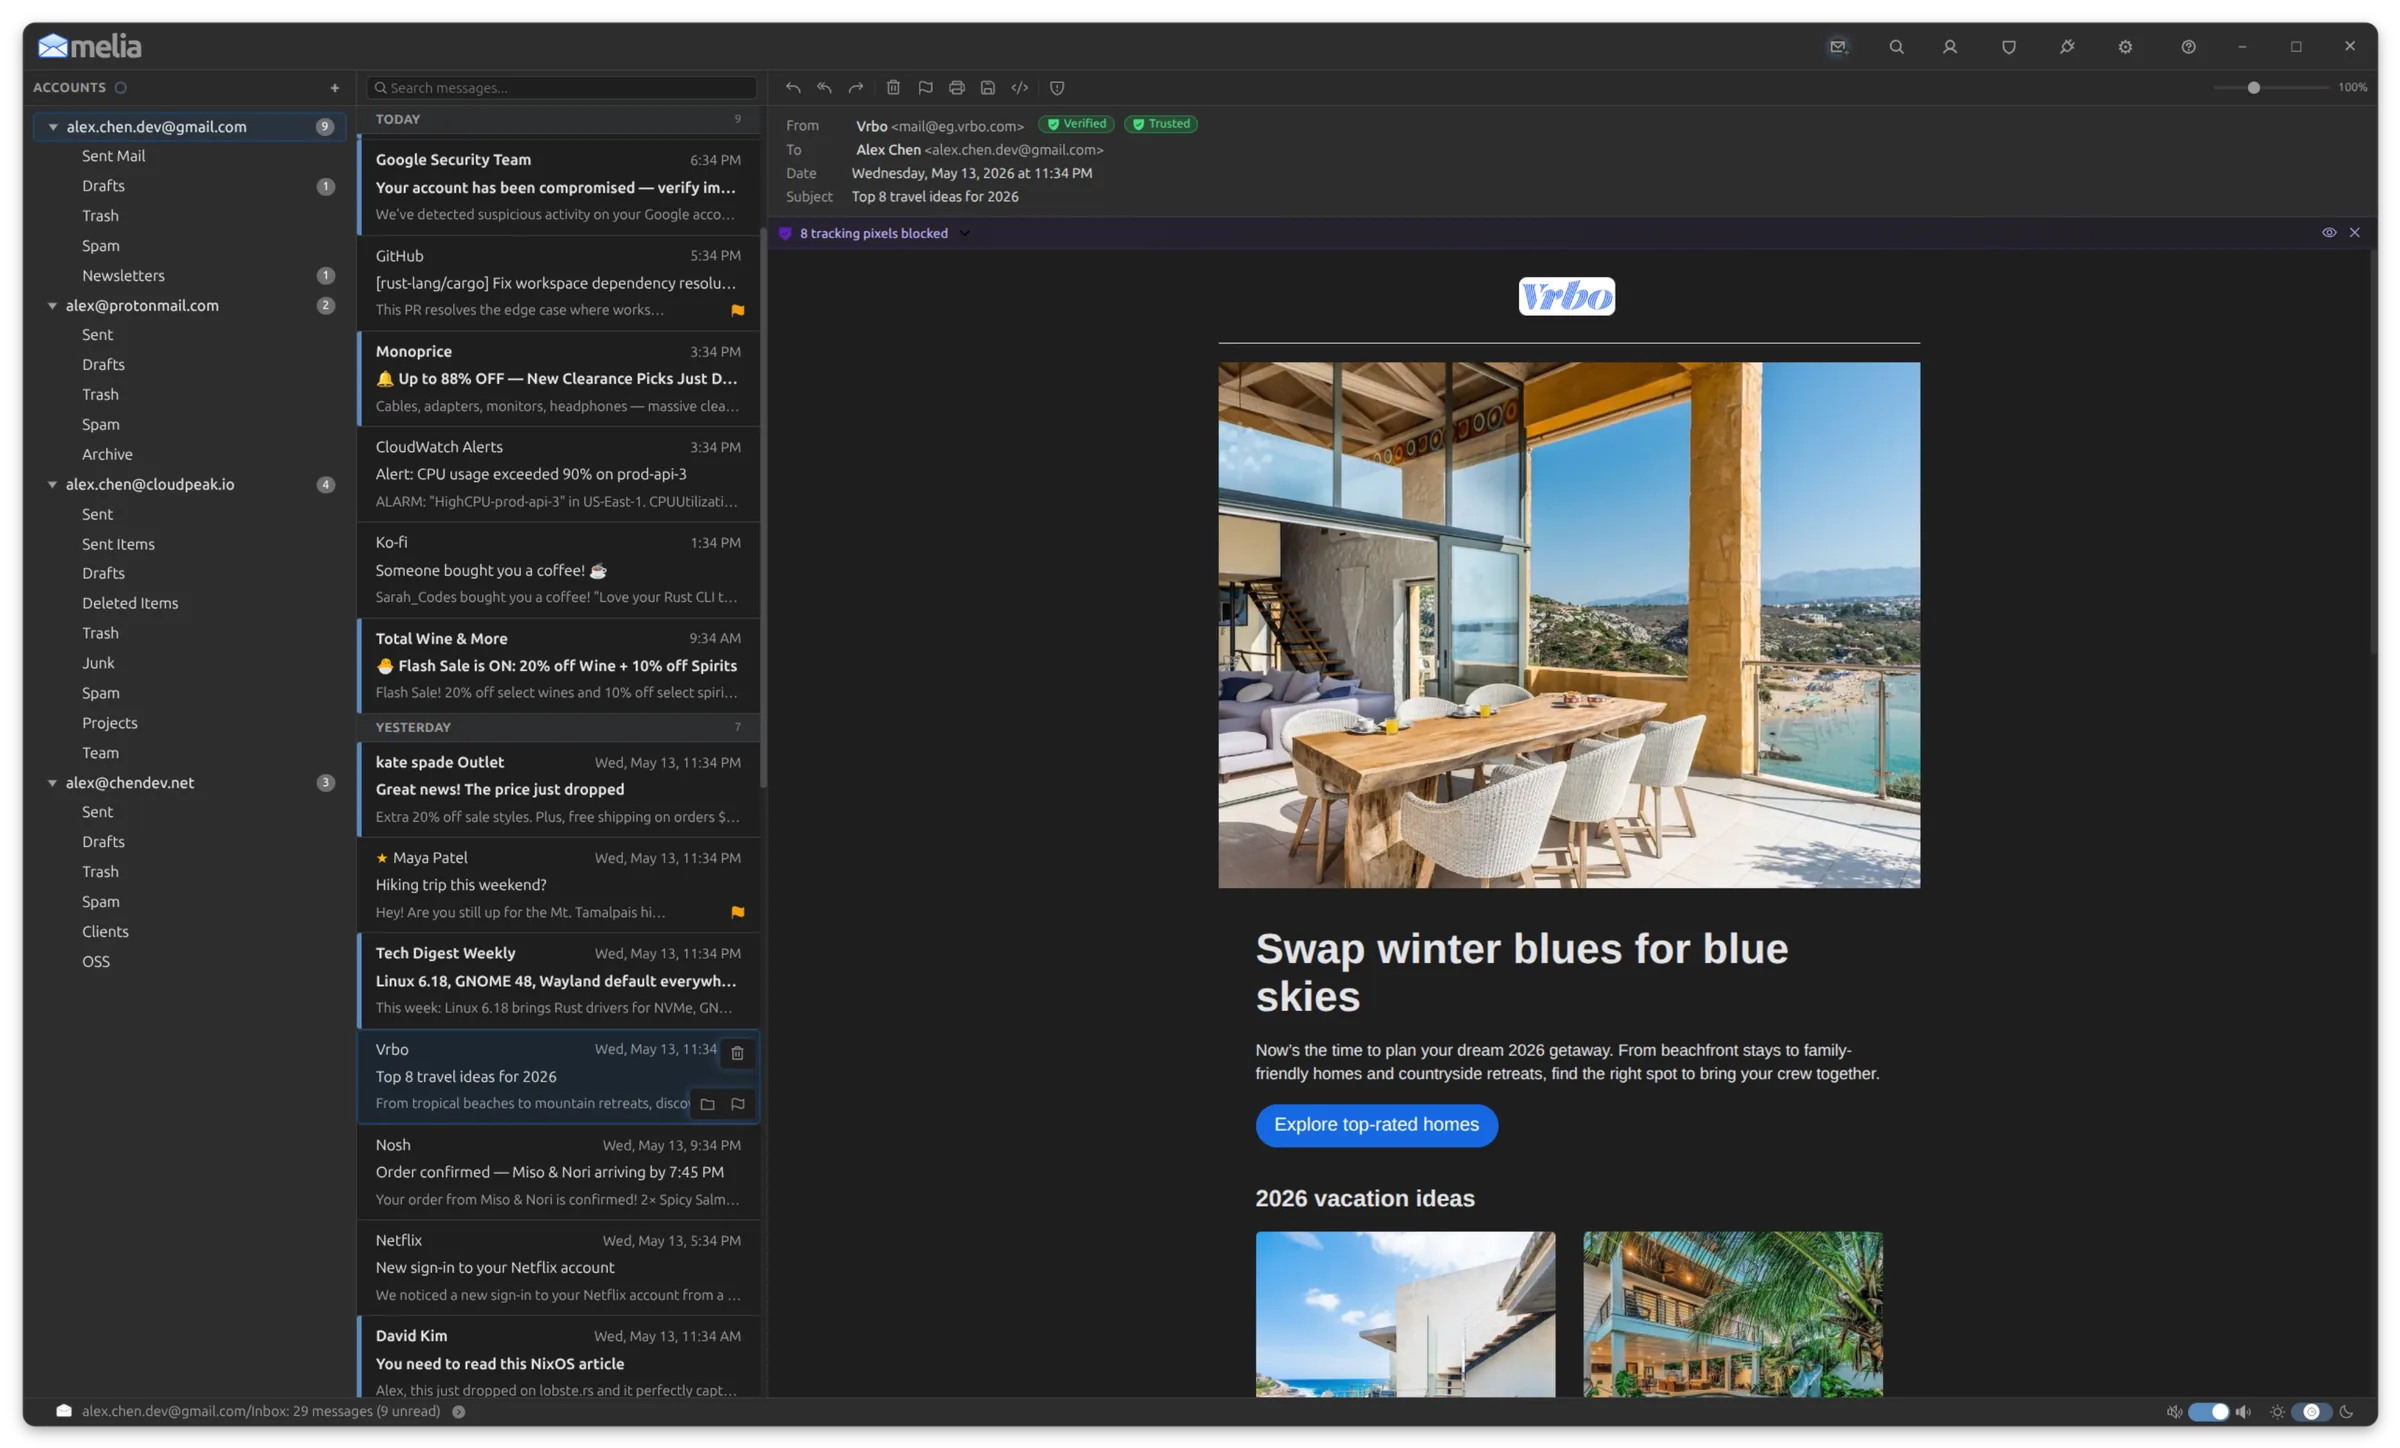
If you have used webmail your whole life, a desktop email client works differently in a few small ways, and one or two of them look like something has gone wrong when it hasn't. This guide walks through the parts that actually trip people up, and skips the parts you can work out on your own.
You can read it start to finish in about fifteen minutes, or jump to the bit you are stuck on. Press Ctrl+P at any time to print it, or save it as a PDF.
1 Install Melia
Melia ships in five formats. They are the same application; the difference is how your system installs and updates it. If you do not already have a preference:
- Ubuntu, Linux Mint, Debian, Pop!_OS, and anything else in that family: take the .deb.
- Fedora, RHEL, Rocky, Alma: take the .rpm.
- Anything else, or you are not sure: take the AppImage. It runs on virtually any distribution without being installed at all.
Snap and Flatpak are there too, and both are good choices if that is how you prefer to install software. Both can keep themselves current: the Snap Store version updates in the background, and the Flatpak does the same once you add our repository. All five live on the download page.
Intel, AMD, or ARM?
Nearly every desktop and laptop is Intel or AMD, and every download above is built for it. If you are on ARM64 hardware instead, an Apple M-series machine running Linux, an Ampere box, or a 64-bit Raspberry Pi, take the ARM64 AppImage.
Two things to know about it. ARM64 ships as an AppImage and nothing else, so the .deb, .rpm, Snap and Flatpak are all Intel and AMD only. And it is the complete application rather than a reduced port: same features, same protection, same keyring and tray integration, and in-app updates keep an ARM64 install on ARM64. There is nothing extra to install, and it has been tested on an Apple M1 running Fedora Asahi Remix.
If you are not sure which you have, ask your system:
x86_64 means the ordinary downloads. aarch64 means you want the ARM64 AppImage.
Installing the .deb or .rpm
Double-click the downloaded file, click Install in your software center, and launch Melia from your application menu. If you would rather use a terminal:
On Fedora, use dnf rather than rpm -i so dependencies resolve. The package is not signed yet, so dnf prints a line about skipping OpenPGP checks. That is expected, and the install completes normally.
Installing the AppImage
An AppImage is a single file that contains the whole application. Nothing installs; you run the file. There is one step that catches almost everybody: a freshly downloaded AppImage is not allowed to run until you mark it executable. Until you do, double-clicking it does nothing at all, or opens it in a text editor.
Marking it executable, without a terminal
- Open your Downloads folder in your file manager.
- Right-click the AppImage and choose Properties.
- Turn on Executable as Program (some file managers call it "Allow executing file as program").
- Double-click the file to launch Melia.
Or, in a terminal, in the folder you downloaded it to:
2 Add your first account
Melia does not come with an account. The first time you open it, the left sidebar is empty: a heading that says Accounts, a + button beside it, and the words "Add an account" below. Click the +.
Any ordinary email account
- Type your address into Email Address, then press Tab or click somewhere else. Melia looks your provider up and fills in the server settings for you. It knows most of the big ones by name and finds many of the rest through DNS.
- If it did not find yours, pick it from the Provider dropdown. If it is not in the list either, choose Custom and enter the servers by hand. Your provider publishes them under a heading like "IMAP settings"; incoming is usually port 993, outgoing 587.
- Display Name is what your recipients see next to your address. Melia previews it live as you type.
- Under Authentication, Username is almost always your full email address. Type your password into the Password field.
- Click Add Account.
Melia connects, builds your folder list, and starts downloading mail. A large mailbox takes a few minutes to come down the first time, and you can start reading as soon as messages appear.
Melia is free for one account. Add a second one and it asks for a license key first: one payment of $10, no subscription.
Gmail needs an App Password
Gmail will not accept your normal Google password from a desktop mail client. It wants a 16 character App Password, which Google issues per application. That is the supported way to connect a Gmail account to Melia; there is no "Sign in with Google" button and there is not meant to be one.
- Turn on 2-Step Verification on your Google account. Google will not create App Passwords without it.
- Pick Gmail in the Provider dropdown. Melia shows a note with a link straight to Google's App Passwords page.
- Google gives you 16 characters, shown as four groups of four. Copy it.
- Paste it into Melia's App password field. Paste the spaces if it is easier; Melia strips them. If what landed is not 16 characters, Melia tells you how many it counted.
- Click Add Account.
That App Password only works for mail, and only in Melia. Revoke it in your Google account whenever you like and Melia loses access; nothing else you own is affected.
Google Workspace accounts on a custom domain work the same way whenever 2-Step Verification is on.
Microsoft accounts sign in through your browser
Outlook.com, Hotmail, Live, MSN and Microsoft 365 do not take a password typed into Melia at all.
Choose your account type in the Provider dropdown and click Sign in with Microsoft. Your normal web browser opens on Microsoft's own sign-in page. Sign in there, approve the request, and the browser hands the result back to Melia. You can close the tab afterwards.
If your workplace runs its own app registration, open Use my organization's app registration and enter the two IDs your administrator gives you. Most people never need this.
When the password will not stay saved
Melia keeps passwords in your system keyring, encrypted with a key the keyring holds. If it cannot, one of three things has happened, and they are not equally serious. The first two stop Melia working properly, so it raises a dialog at startup telling you which one it is. The third leaves everything working and does not interrupt you at all, so you would only find it by looking.
“Melia can't unlock your saved passwords.”
Your passwords are saved and intact, but the keyring is locked, so Melia asks you for the password on every launch. Unlock your login keyring (Passwords and Keys, or KDE Wallet) and set it to unlock automatically when you log in.
“Melia can't save your passwords.”
There is no secure storage on this machine at all, so what you type is discarded rather than saved. That is why it asks again every time. Install and enable a keyring, then log out and back in.
“Melia can't reach your system keyring.”
This is the quiet one. Your passwords are saved, just in a weaker local store, and mail works normally, so Melia does not stop you with a dialog about it. Installing or enabling GNOME Keyring or KDE Wallet moves them somewhere properly encrypted.
Whichever you get, the dialog has a Restart Melia button so the fix takes effect. And you do not have to wait to be told: Settings → Application → System shows the current state at any time in its "Data & credentials" box, and its How to fix button opens the same advice for all three, including the quiet one.
If you installed the Snap, that third case is a permission rather than a fault, and it is the one install where Melia does prompt you about it. A confined snap cannot reach the keyring until you grant it. Melia points you at Settings → Apps → Melia in your system settings, and gives you the command to copy if you prefer the terminal:
Then click Restart Melia.
3 Find your way around
Melia has three panes, left to right.
Accounts and folders
Every account you have added, each one opening into its folders: Inbox, Sent, Drafts, Trash, Junk, and whatever else you keep on the server. This is the pane you use to move around.
The message list
What is in the folder you selected, newest first.
The reading pane
The message you have selected, with its Reply, Reply All, Forward, Delete and Flag buttons along the top.
To resize a pane, drag the divider between it and its neighbour. Melia remembers the widths, so you set them once.

Two things worth knowing early, because they differ from webmail:
Your inbox is a list of messages, not a list of threads. Each message is its own row, in the folder it actually lives in, exactly as your mail server holds it. If you have come from Gmail, that is the biggest single difference, and it is deliberate: nothing is collapsed, merged, or rearranged on your behalf.
Conversations are there when you want one. Select a message and press I (or use the button in the reading pane's toolbar, which carries the message count). The list narrows to that conversation and nothing else. Press I again and the rest of the thread joins it from your other folders, your own replies included. A third press, or Escape, puts you back where you started, and so does simply navigating somewhere else. Melia works out what belongs to a conversation from the reply headers rather than the subject line, so two unrelated messages that share a subject never end up together. The features page has the full behaviour.
Your accounts stay separate unless you ask otherwise. Melia can show every account's inbox merged into a single chronological list, called All Inboxes (with a matching All Spam), but both are off until you turn them on in Settings → Mail → Unified. Even then, every message keeps its real home: acting on a row acts in the account it came from.
If you would rather have the reading pane out of the way and read messages full width, press V for the two-pane layout, or set it in Settings → Interface → Layout.
Melia has keyboard shortcuts for nearly everything, and you do not have to memorise any of them: press ? to show a hint bar along the bottom of the window with the keys that apply to whatever you are doing.
4 Read, reply, and write
Click a message in the list and it opens in the reading pane. It is marked read three seconds later, which is long enough that clicking past something on your way somewhere else does not mark it. You can change that delay, including to "Immediately" or "Never", in Settings → Mail → Reading.
If you would rather a single click only highlighted a message, and nothing opened until you meant it to, set Open messages with to Double click in the same place.
Reply, Reply All, Forward
- Reply (R) writes back to the sender only.
- Reply All (A) writes back to the sender and everyone else who was on the message. Worth a glance at the recipient list before you send.
- Forward (F) sends the message on to somebody new.
All three are buttons along the top of the reading pane, so the keys are optional.
Writing a new message
Press N, or Ctrl+N, for a new message. It opens in its own window, so you can keep reading while you write.
Fill in To, and use Cc/Bcc if you need them. To attach a file, click the paperclip (Attach Files) or drag the file onto the message. When you are done, click the send button (the paper plane at the right of the toolbar), or press Ctrl+Enter.

The eight seconds after you press Send
Sending is not instant, on purpose. For eight seconds after you press Send, Melia holds the message and offers you an undo in the status bar at the bottom of the window. Click it, or press Ctrl+Z, and the message does not go. The reminder counts down, and resting your pointer on it pauses the clock. If eight seconds is too short or too long, set anything from 5 to 20 under Settings, Sync, Undo window.
What happens next is worth knowing so it does not surprise you: undoing a send reopens the message in a compose window, exactly as you left it, rather than filing it in Drafts. Carry on editing, or close it and discard it.
5 Organize your mail
Your folders are the ones on your mail server, so anything you do here shows up in webmail and on your phone too.
Moving messages
Two ways, whichever suits you:
- Drag a message from the list onto a folder in the sidebar. Hold it over a collapsed folder for a moment and the folder opens so you can drop it into something inside.
- Right-click the message and choose Move to folder…, then pick the destination. The keyboard equivalent is L.
Both work on a multiple selection: click one message, then Ctrl-click or Shift-click others, and the menu offers to move all of them.
Delete, and Archive
Delete (the Delete or Backspace key, or the toolbar button) moves a message to Trash. It is a move, not a shredder, and Melia gives you the same undo window to take it back from the status bar.
Archive is the other habit: get it out of the inbox without deciding it is rubbish. In Melia, Archive is off until you set it up, and you set it up per account, because Melia has to be told which folder on that account is the archive. Open the account's settings, go to the Folders tab, turn Archive on and pick a folder (or create one). After that, E and the Archive button in the reading pane appear and file mail there.
Flagging
A flag is your own marker for "come back to this". Press S, or right-click and choose Flag, or click the flag in the reading pane's toolbar. Flags are stored on the server, so they follow you to your other devices.
6 Find anything
There are two searches, and the difference is worth thirty seconds of your time.
Quick search lives above the message list and searches the folder you are in. Press / or Ctrl+F, type, and the list narrows as you go. This is the one you will use twenty times a day.
It understands more than single words: || means either, && means both, ! leaves a word out, parentheses group, and quotes match exact text. The line under the box shows how Melia read your search, and the ? button beside it explains the rest. To see everything from one sender instead, select a message and press @. Press it again for their whole domain, and once more to go back.
Advanced Search is a separate window for the harder questions: something from a particular person, last month, with an attachment, in an account you cannot remember. Press \ or Ctrl+Shift+F to open it. You can search across All Accounts and All Folders, restrict to a date range, choose which parts to search (subject, sender, recipient, body), and filter to unread, flagged or attachment-bearing messages.
Inside that window, Quick and Super are two modes of the same search. Quick takes a phrase. Super builds real conditions, several at a time, including negative ones like "sender is not". Switch between them with the toggle at the top.
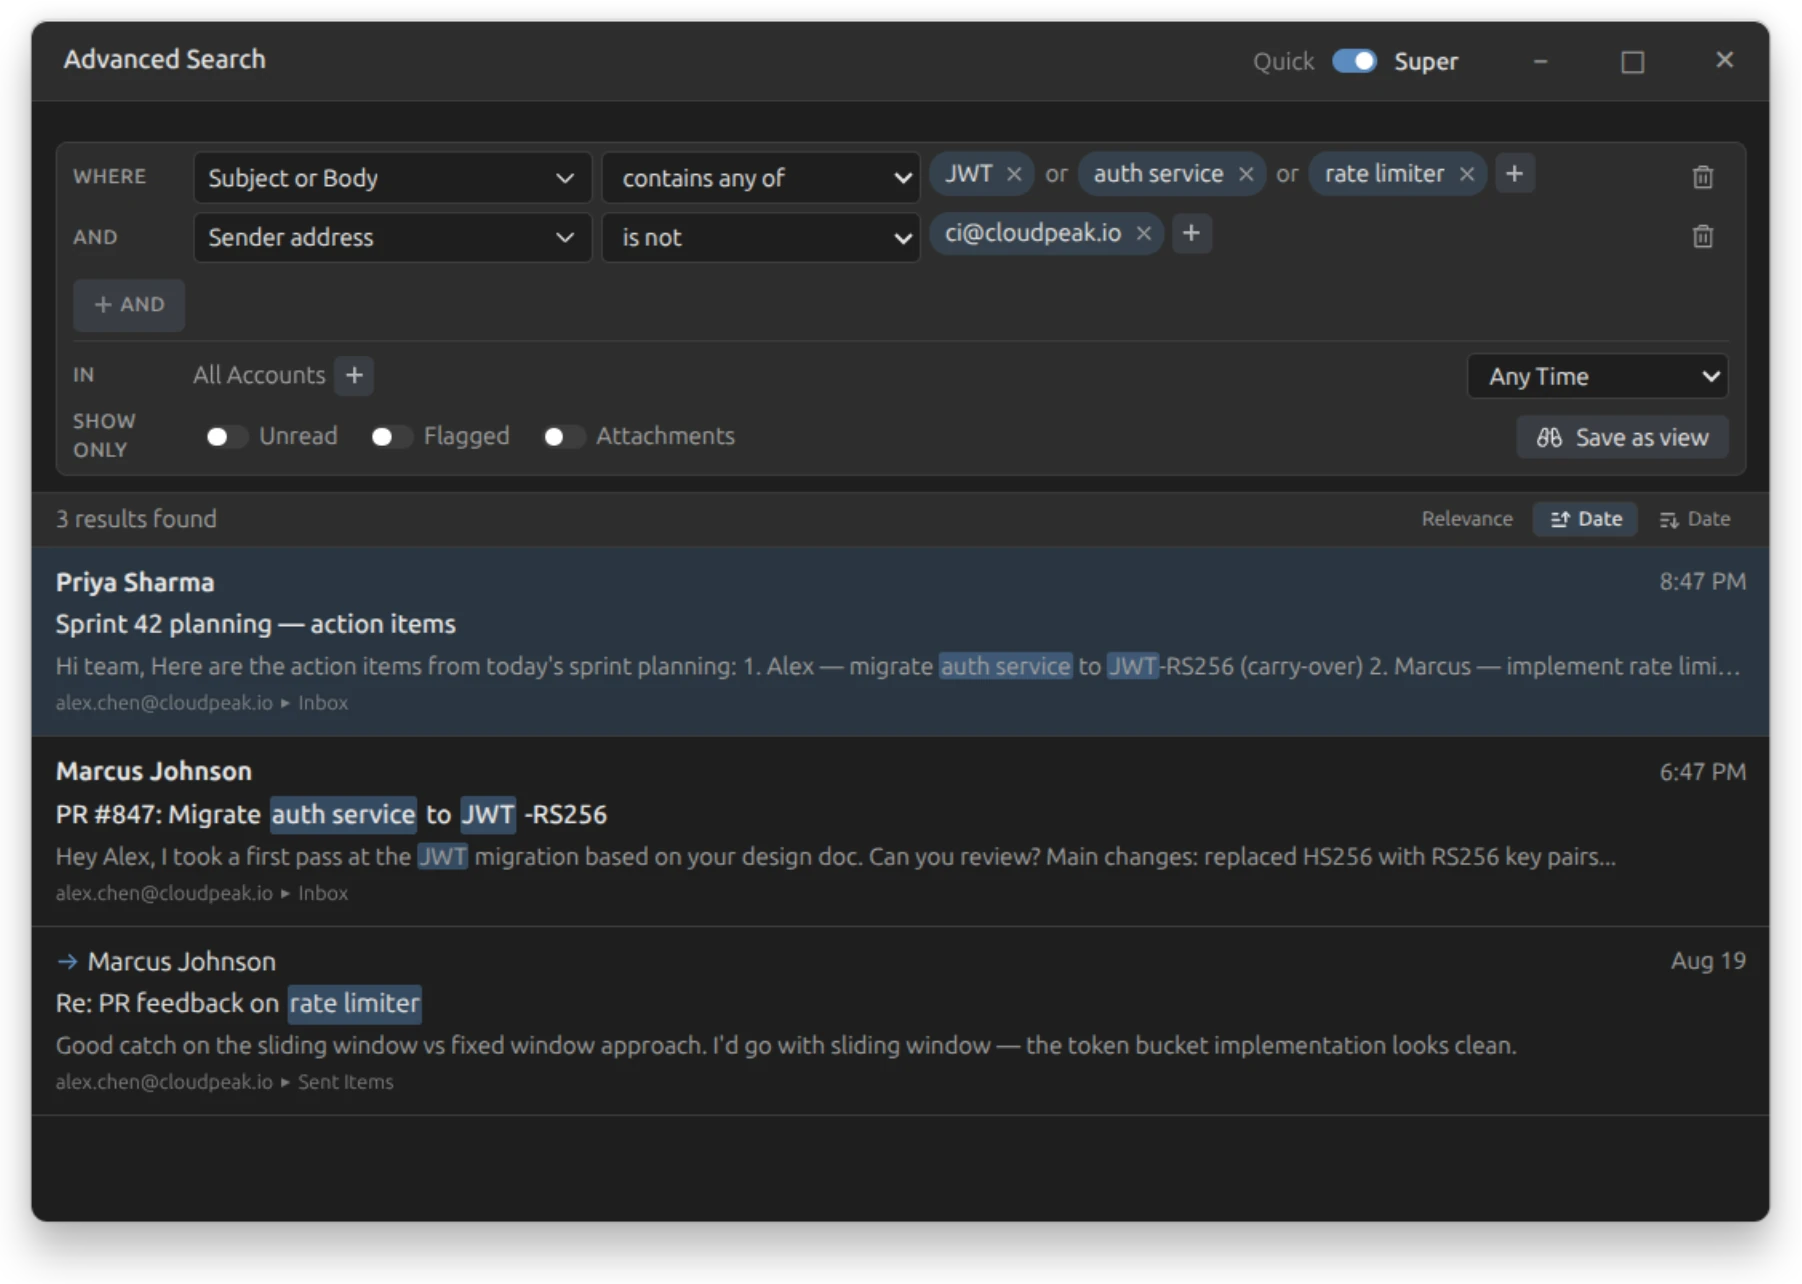
When a search is one you will run again, click Save as view, give it a name, and it appears under Views at the top of your sidebar. Clicking it re-runs the search. That is the payoff for learning the search window: "everything unread, everywhere" becomes one click, permanently.
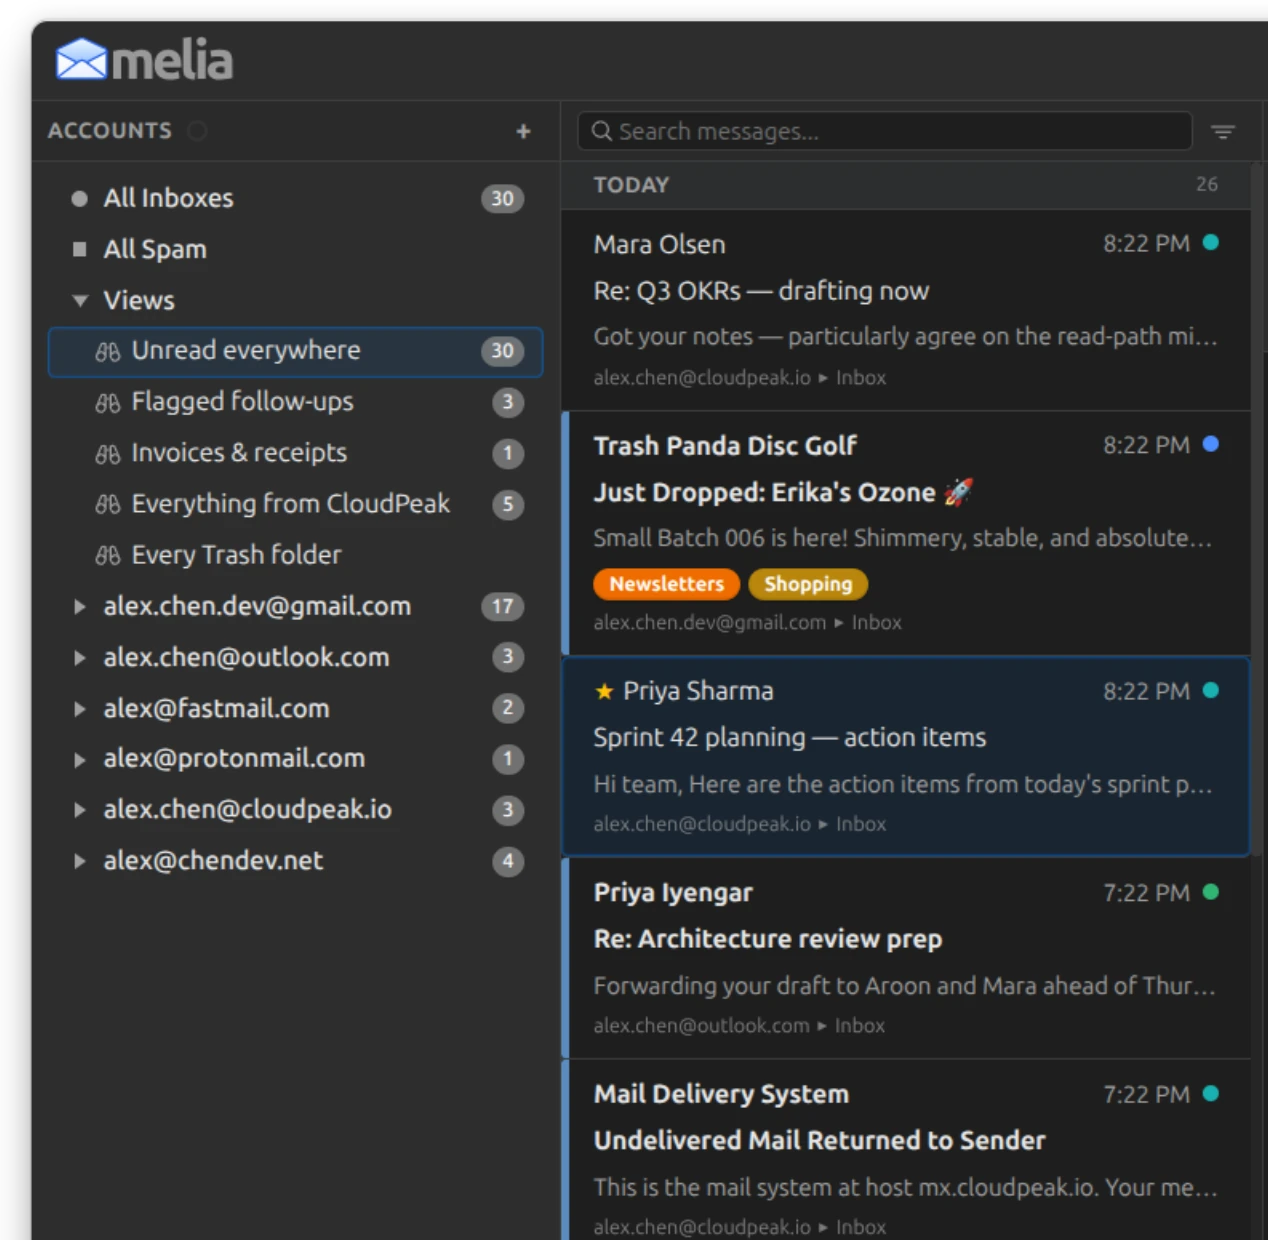
There is a guide to views on their own: Saved Views covers building the search, scoping it to whole accounts or to every folder of a kind, and changing a view after you have kept it.
7 Why does my email look like that?
Some of what Melia does to an incoming message is visible, and if you have come from webmail it can read like something is broken. Almost always it is not. Here is what each of those bars and badges means.
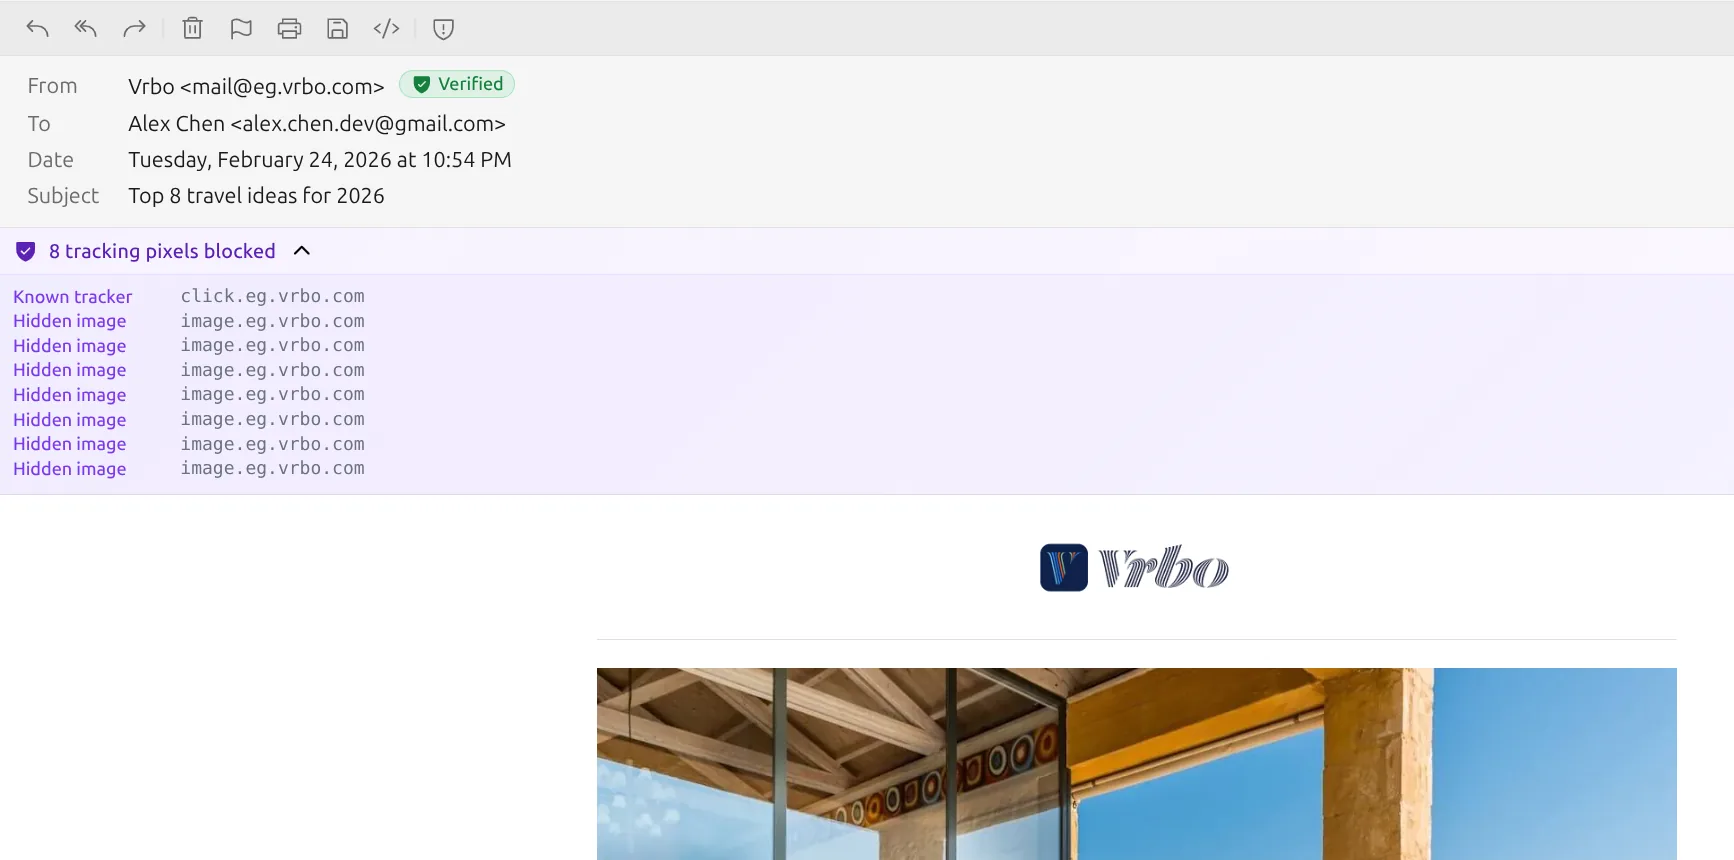
"8 tracking pixels blocked"
A tracking pixel is an invisible image, usually a single transparent dot, that a sender embeds so that opening the message quietly tells them you opened it, roughly when, and from what IP address. Melia strips them and shows you the count. This is on out of the box.
Nothing you were meant to read is missing, because a tracking pixel has no content. Click the bar to see exactly what was blocked. The eye button allows trackers for that one message, which you will rarely want.
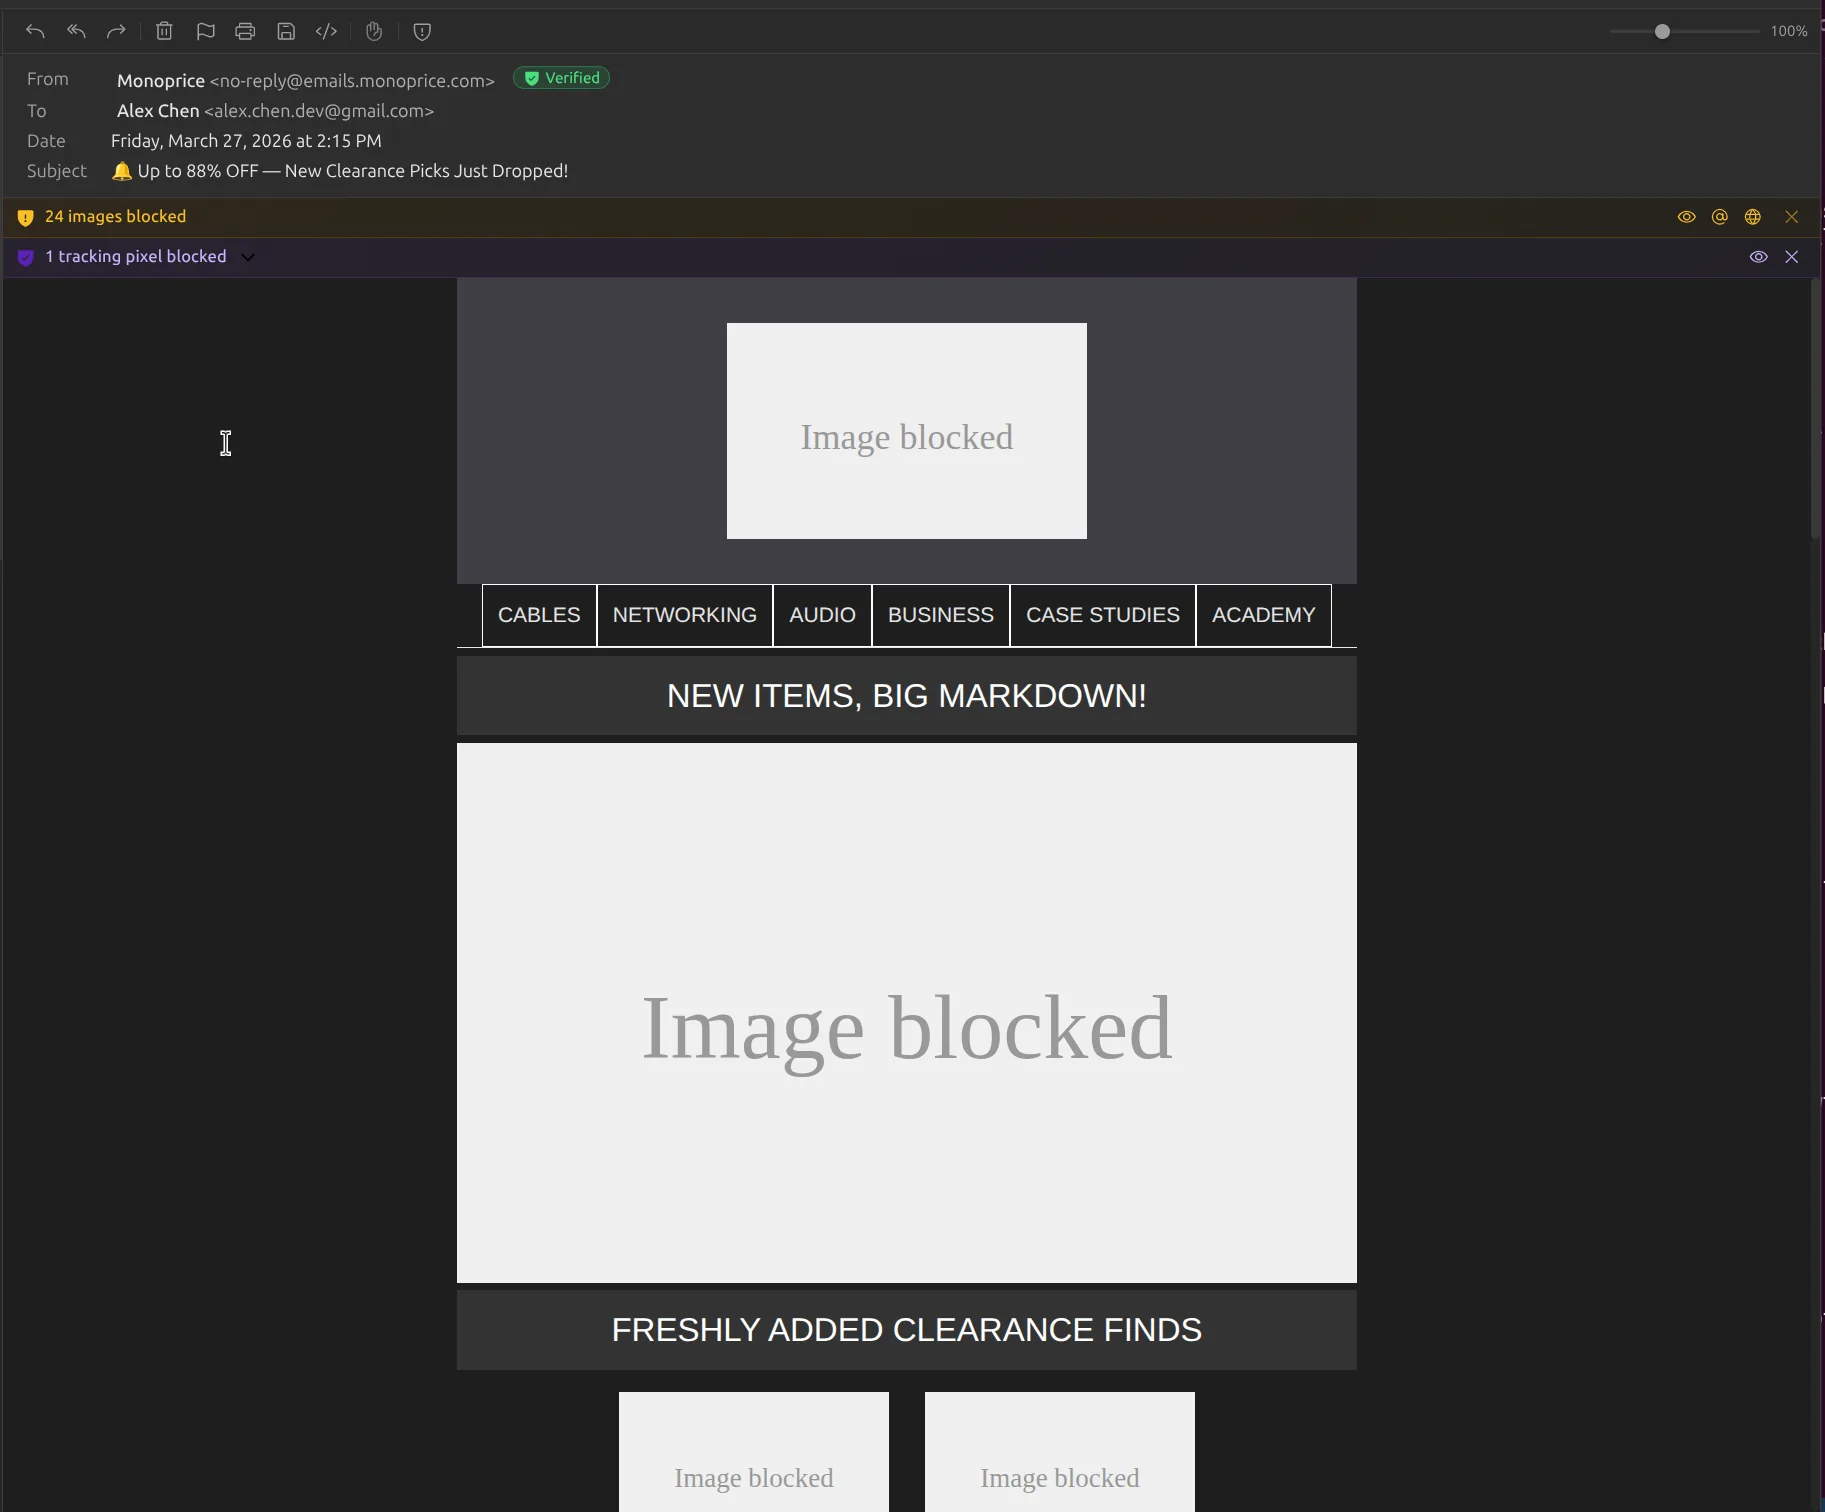
"24 images blocked"
If a message has grey Image blocked boxes where pictures should be, you have Block remote images switched on. It is off unless you turned it on, in the Trust Center (press T) under its Settings tab.
The reason to turn it on: pictures in an email are not part of the message. They are fetched from the sender's server as you read, which tells that server you opened it. Blocking them all is the strictest setting, and it costs you one click per message you actually want to look at. That is what the bar across the top of the message is for:
- the eye loads the images for this message only;
- the @ trusts this sender, so their mail always loads;
- the globe trusts everyone at that domain;
- the X leaves the images blocked and hides the bar.
Trusted senders are listed under Trust Center → Trusted, and you can remove one there whenever you want. The setting is global rather than per account, so a new account you add later inherits whatever you have already chosen.
A message in Junk looks completely dead
Open something in a spam folder and you get a Quarantined view notice: no images, no tracking, and links that do nothing when clicked. Melia says why in the bar itself. The message is in a spam folder, so it is treated as hostile and is not allowed to contact any server at all.
There is no button to unblock it, and that is on purpose. Spam is where the genuinely hostile mail lands, and a "load anyway" button in that folder is exactly the button an attacker is counting on. Attachments follow the same rule: you can save one to disk after confirming, but Melia will not open it for you.
If the message is not spam, mark it Not spam with the ! key. That moves it to your inbox, where it renders like anything else.
The email is bright white and everything else is dark
By default Melia renders messages to match your theme. Most HTML email was designed for a white page, so on a dark theme Melia is re-colouring somebody else's design, and now and then it shows.
Press D to flip that one message to the other mode and see it as the sender built it. It goes back on its own when you move to the next message. If you would rather every message keep its original colours, set Message background under Settings → Interface → Appearance.
The badge next to the sender's name
Melia checks the SPF, DKIM and DMARC records for each message and puts the verdict beside the sender: Authenticated, Partial, Failed, Unverified or Unknown. Click it for the individual results.
Authenticated means the message really came from the domain it claims. It does not mean the message is safe, and Melia says so in the panel itself: authentic domains send scams too. Read it as "this is genuinely from paypal.com", never as "this is genuinely from PayPal and you can trust it".
Unverified is not an accusation either. Plenty of small and older mail servers publish no authentication records at all.
"This message is encrypted"
Melia reads OpenPGP and S/MIME encrypted mail, but only with the key the message was encrypted to. If you haven't given Melia that key, it says the message is encrypted rather than showing you an empty one. Import your key in Account Settings, Encryption, or create a new OpenPGP key there, and the message opens.
8 Make it yours
Settings open with , (the comma key) or from the gear in the toolbar. There are a lot of them. These are the five worth five minutes on your first day.
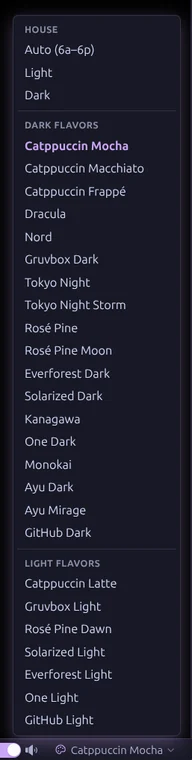
Theme
Settings → Interface → Appearance
Light, dark, and a long list of flavours if you have a favourite palette. There is also a quick light/dark switch in the status bar at the bottom of the window.
Interface size
Settings → Interface → Display
Everything too small, or too large? This scales the whole application. Ctrl and + or - does the same thing on the fly, and Ctrl+0 puts it back.
Three-pane or two-pane
Settings → Interface → Layout
Two-pane hides the reading pane and gives the message its full width when you open it. Pressing V switches between them without opening Settings at all.
Mark as read after
Settings → Mail → Reading
Three seconds by default. Immediately, up to five seconds, or Never.
Notification sound
Settings → Alerts → Sounds
Pick a different arrival sound, silence it, or add your own file. If you run several accounts, each one can have its own sound, set in that account's settings, so you know who the mail is for without looking.
Two more that people go looking for by name: the fonts your mail is displayed in are under Settings → Mail → Fonts, not Appearance, and every keyboard shortcut is listed (and can be switched off individually) under Settings → Interface → Shortcuts.
9 When something goes wrong
Melia sends no telemetry. Nothing is collected, nothing is uploaded, and there is no crash reporter phoning home. The flip side is that if something breaks, we do not know unless you tell us, so there is a reporter built in that does the tedious part for you.
Open Settings → Application → Contact. Under Report a problem, click Send Diagnostics Email.
Melia asks five short questions first (what you were trying to do, what happened, what you expected, whether you can make it happen again, and anything else). Only the second one is required, and there is a Write it myself button if you would rather skip the form. Then it opens an ordinary compose window addressed to the developer, with your answers written into the body and Melia's own logs attached: connection diagnostics, the connection log, and sync activity.
Nothing is sent until you press Send
That message sits on your computer, in a window you can read and edit, exactly like any other email you write. Open the attachments if you want to see what is in them first. They record what Melia did, meaning server names, ports, timings and your own account addresses. They hold none of your mail: no message text, no subjects, and no names or addresses of the people who write to you, apart from anything a server quoted back in an error.
If you would rather not use the reporter, or your question is not a bug:
- Email melia@buxjr.com, or use the form on the support page.
- Open an issue on GitHub if you are comfortable there. Bugs filed publicly get fixed publicly, which helps the next person with the same problem.
- The FAQ answers the questions that come up most, and the support page has troubleshooting for the common ones.
Melia is written by one developer, and the mail you send goes to him rather than to a ticket queue.